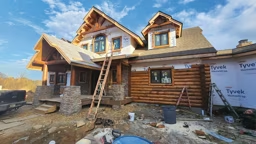


We’re closing in on the finish line! With the major exterior work on our house complete (with the exception of staining and landscaping), it’s now time to turn our attentions to the interior punch list, starting with wiring our log home for electricity.
Running a log home’s electrical systems is something that confuses a lot of log home buyers, but there’s really nothing to it, as long as your builder and electrical subcontractor know what they’re doing in a log house.
For the electrical component of our home, my wife, Becky, and I developed a scope of work that we wanted to accomplish. We wanted separate electrical circuits for each room and appliance, security lights at the basement door and back doors, an extra-large circuit breaker panel, floor boxes, ceiling fans and ample lights throughout the house.
These items were all reflected on our electrical schedule, which is provided to your builder as part of the blueprint package. The schedule shows, in detail, where each wire is to be run, and each switch is to be installed. The electrical schedule is an important road map in the construction of any structure, but in a log home, getting it right is vital. Once the chases are drilled into the logs, there’s no turning back.

Since some wiring likely will need to be run through pre-drilled chases, either within the log walls or through the ceiling, it’s vital to have a well-planned electrical scheme before construction begins.
Per our electrical-layout drawings, our builder drilled and marked access holes for outlets and switches through the logs into the basement. This was done simultaneously as the logs were erected. At the second floor and loft, all of the wiring needed for the fans and ceiling lights were pulled, hiding the wire in the framing work and floor/ceiling joists.
After talking with our local building inspector, he advised us that all smoke and carbon monoxide detectors be hard-wired and installed on the same circuit with a battery backup. He also advised us to make sure that our electrical contractor installs GFCIs (ground fault circuit interrupters) at all wet areas (kitchen, bathrooms, laundry, etc.)
While I oversaw the progress on the wiring installation, Becky got to work on the fun part — picking out all of the lighting fixtures, fans, switches and face plates. She found most of these materials at Home Depot, which helped us save money both on the items, themselves, and their procurement. The only materials that our electrical contractor needed to supply were the wiring, boxes, breaker panel, outlet receptacles switches and miscellaneous connectors.
Back on the job site, the electrical contractor’s responsibility was to run the wiring to the electrical box, install the breaker panel and circuits, hook those circuits to the wires, install lighting fixtures, appliances, ceiling fans, switches and outlets all per the National Electrical Code (NEC) or NFPA70.

Almost every log home has some conventionally framed interior walls, which makes running wiring and installing switch and outlet boxes a little more straightforward. But it is possible to install them on log walls, too.
Unfortunately, our log home’s electrical installation took a bad turn — not because of the project itself, but due to the subcontractors we’d selected to do the work. The initial electrician we hired was very familiar with log home installations, and, at first, he was very punctual and worked long hours. Then it dropped to three days a week, then once a week. When we confronted him about this situation, we learned he was not as reputable as we’d believed. We fired him on the spot, even though it meant we’d be out a substantial amount of money.
The contractor we hired to replace him came highly recommended and had an immense amount of electrical knowledge. In fact, he was employed by our county housing authority. After several weeks of work, he asked us for prepayment to finish the job. Trusting him, we gave him the money. We never saw or heard from him again, and later we discovered he’d moved to Ohio.
This left us with our electrical system three-quarters finished and no idea where to turn. Becky and I were able to wire up several of the remaining ceiling lighting fixtures ourselves, but there still was technical work to be done. Luckily for us a friend stepped up to the plate and finished the project and didn’t ask for payment until the end.
The moral of this story is that there will be setbacks, but there’s always a solution. Don’t let a few speed bumps prevent you from finishing the race strong, and never let them deter you from your log home dream.
Gary’s Guidance:
Providing a separate circuit for each room and appliance allows for work to be done without turning off the power to other areas. This also allows you to trace the wires more easily when there’s an outage or another issue. Talk with your electrical contractor and refer to the NEC to make sure that your breaker panel has the capacity to service the required circuits now and has room for future expansion.
See Gary's Log Home Journey leading up to this point here:
How to Find the Perfect Log Home Floor Plan
Learn About the Log Home Construction Process
How to Choose the Right Log Home Builder