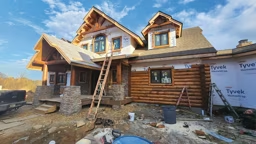


When you take on a large, complex project, like building a home, you need to brace yourself for a variety of stops and starts. Our experience has been no different. After months of frustrating setbacks, like dealing with codes officials and being pushed back on a few of our subcontractors’ schedules, it was finally time for my wife, Becky, and I to place our log package order with Hochstetler Milling. Now construction can finally start.
From the very beginning of our journey, Becky and I wanted to take a hands-on approach. Since I’ve been in the construction industry all of my career, we decided that we would serve as our own general contractors — a course of action I don’t recommend unless you are very familiar with all construction phases and building codes.

Before the logs arrive, we needed to select an excavator and foundation contractor. In normal practice, it’s customary to solicit three bids for each construction phase. This way you can compare cost quotes to ensure the best price to meet your budget. In our case, we personally knew both contractors and felt that their pricing was fair.
Our excavating contractor, Nicely Contracting, not only dug our foundation but would also install our septic system later on in the process. Since our house was being built in a virgin corn field, he had to scrape off approximately 18 inches of topsoil and reserve it to be spread for our final grade down the line.
See also Laying the Groundwork for Success
Our foundation contractor used “Form-A-Drain” to create the footer. This is a permanent form, consisting of lineal sections installed as the foundation footing forms, that acts as both the drain and the form. It eliminates the need for separate wood forms and piping. The cost of using the “Form-A-Drain” is less than using the wood forms and drain pipe, because you don’t need to install and remove the wood forms and then place the piping separately. This saves a ton of money on labor and shaves time off the construction schedule — a big plus when you’re already behind like we were.

Next it was time to install the concrete block foundation. Prior to the contractor laying the block, we reviewed with our building inspector the locations of the basement windows, both for egress to meet the code.
We decided to use a 13-block-high foundation wall for additional headroom in the basement. The last course of block was termite block. Prior to back-filling, we waterproofed the block and used 3-inch thick foam insulation to help create a warmer basement. With the foundation completed, it was time for the logs to arrive, and Becky and I couldn’t wait to see our log home take shape!
See also 7 Essential Questions to Answer Before You Break Ground