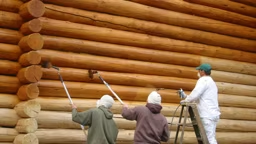


Photo: Joseph Hilliard / See more of this home here.
Fall is the best time for some of the routine maintenance that keeps a log home sound, solid and looking good. Sunlight and water are logs’ greatest enemies. They’re constantly attacking wood, degrading finishes and breaking down seals and coatings.
In addition, the wear and tear of constant use attacks mechanical equipment and appliances. Setting aside a weekend or two before winter fully sets in can keep all of these threats to your comfort and pocketbook at bay.
Here are three steps that you can take as the seasons change to keep your log home in top condition.
1. Take a walk
Circle your log home and inspect its finish and seals. Your logs should still have most of the color you originally applied. If you used a clear finish, the wood should still have its natural luster. Logs that have turned black or dingy gray have lost their protective finish, exposing the wood to degrading ultraviolet light and moisture. Pay special attention to logs and wood trim close to the ground.
Splashing from heavy downpours or constant soaking from last winter’s melting snow make these areas especially susceptible to wood damage and rot. While you are examining the logs, look at the seals between them. Caulking and chinking both eventually feel the effects of weather and start to break down. Stretched or torn seals that can result from wood movement or shrinkage create openings for water and insects. Touch up damaged spots with a caulk gun.
For larger areas, use a utility knife to remove the old caulk and replace it with fresh. Inspect gutters and eaves for discoloration indicating that water has lingered there too long. Use a ladder to check rain gutters for leaves and debris. Make sure downspouts are clear and that there is a means to disperse water at the bottom to avoid erosion where the water emerges.
Check chimneys to make sure screens are clear and rain caps are in place. Clear out wasp or bird nests you may have picked up over the summer.
2. Break Out the Garden Hose
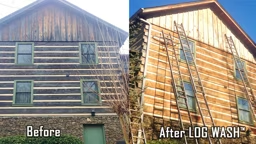
Sometimes you can’t tell from the color and condition of dry logs whether the finish is in good shape. Spray a large area of logs, using a hose equipped with a shower-type nozzle. If the water beads or runs off in little rivulets, your finish is still working.
If the soaking leaves patches of darker damp wood, it’s time to re-treat the logs. Check areas that seem to be soaking up water by trying to press a nail or screwdriver into them. If the nail or tool sinks in, clean out the punky wood and fill the void with an epoxy wood filler.
Don’t put this task off because it is a sign wood rot has already set in. Finally, flush gutters and downspouts to make sure they drain freely. If you live in a dusty area, you may want to finish brightening up your logs by power washing them or giving them a brisk rinse with an ordinary garden hose.
If using a power washer, be careful not to gouge the surface with too much water pressure.

Photo: Heidi Long / See more of this home here.
3. Clear Passageways
Check kitchen, bath and dryer ducts. Clear out any lint or bird nests that you find. Change your furnace filter and clean your fireplace flue or call in a chimney sweep. Now you’re all set to light a fire and settle back to enjoy the rest of autumn and the coming winter.
Jim Cooper, a former log-home builder and general contractor, is author of Log Homes Made Easy and The Log Home Project Planner. He is a LEED Accredited Professional and Certified Passive House Consultant.
See also: The Major Threats to a Log Home's Wood