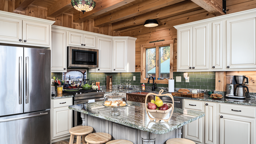


Depending on the type of log system you choose, hanging cabinetry may be no different than it is for a conventional home. But, when the interior logs are rounded, you’ll have to consider a few things before getting to work—namely settlement.
Virtually all full-log homes settle. Depending on the log system, the environment and the logs’ moisture content, this amount can range from fractions of an inch to several inches. If that’s not taken into account, that settlement could result in everything from a lopsided-looking kitchen to more serious consequences, like damaged cabinetry, backsplash tiles and appliances.
Fortunately, there’s an easy solution: Attach your wall and base cabinets to “floating” frames instead of the walls themselves. Here’s how: According to building expert, Jim Cooper, the easiest way to create a floating frame is with 2-by-4-inch furring strips (long, thin strips of wood or metal) fastened vertically to the log wall, using screws and washers.
To allow the furring to float, screw it to the wall through slots cut in the wide side of each strip (see box below for information on how to determine lengths). This lets the logs move without affecting the cabinets.
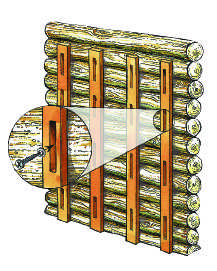
Step 1.
To create slots for the screws, use a 7 1?4–inch circular saw on the 2-by-4s. Then fasten the screws at the tops of the slots.Step 2.
Space the 2-by-4 furring strips every 16 to 20 inches behind the entire cabinet run and make sure there is a 2-by-4 behind each end of the cabinet. Also, cut the 2-by-4s so they reach only to the top of the cabinets. If you allow them to run all the way to the ceiling, they could interfere with settlement.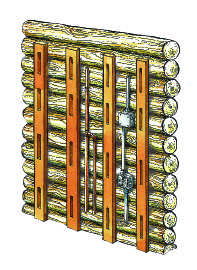
Step 3.
Once the strips are attached to the walls, rough in your electrical and plumbing, then cover the 2-by-4s with drywall or plywood. You also will want to conceal the furring at the exposed ends of the cabinet run with molding or trim.Step 4.
To finish, screw the wall cabinets and base cabinets to the furring or partition wall. Make sure you limit the length of the screws. You only want them to penetrate the frame, not the logs behind them.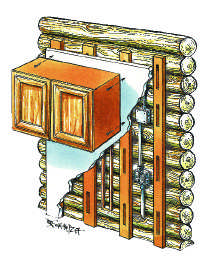
Do the Math:
The size of the slots depends on the amount of anticipated settlement. Here’s an example: Say your wall is made of 13 log courses, where each log is 8 inches wide and the anticipated settlement (for the entire wall) is 1 1/2 inches (ask your log provider for this estimate).A total settlement of 1 1/2 inches means each log will shrink approximately 1/8 inch. Standard upper cabinets are 30 inches tall, which means that they will span approximately four log courses. Within this span, we can expect a settlement of 4 multiplied by 1/8 inch, so a slot measuring 1/2 inch should accommodate the settlement.