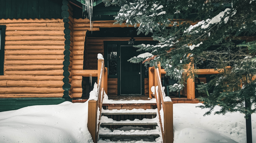


Thinking of embarking on a little log home restoration project? To learn what to expect, we talked to Log Building Maintenance and Restoration owner Tom Kuhns, who has decades of experience manufacturing and mending log homes. Here’s what he had to say:
If your log home is new, how do you prevent major issues from occurring in the first place?
The initial steps any homeowner should take is to make a visual inspection of your home twice a year – in the spring and the fall. In both seasons, but especially in the spring, get on a ladder and check your gutters to make sure they aren’t clogged. If they are, water will run over and splash down on the logs. Check external spigots for leaks or drips, because again, this will create constant, undue moisture conditions on the walls. These are the normal housekeeping kind of things.
While you’ve got the ladder out, inspect your dormers, if you have them. For a lot of people, this area is kind of “out of sight, out of mind,” but in many cases, they don’t have gutters and water can soak the dormer, potentially causing rot. Then check the logs themselves. Look at the visible seals, like caulking and/or chinking. Look for cracks or separations in the material. Keep an eye out for dark spots. If you have an upward facing check that collected water, the wood will darken, indicating the early stages of mold or decay.
It’s important that homeowners look for these signs in the spring and either repair any issues themselves or call a log home maintenance pro to take a look. If left unattended through summer or fall, it’s already too late in the season for most people to get a problem fixed, unless they live in a southern climate — not to mention the additional damage that exposure could cause. And finally, follow your stain manufacturer’s recommendations. If they say their product’s lifespan is three years or five years, be sure to reapply the stain according to their guidelines. Basic maintenance can save you thousands of dollars over a full restoration.
See also Annual Log Home Spring Deck Maintenance


What do you do if you find signs of water damage, mold or rot?
It may be time for a professional home inspection to see if it’s more than an upward facing check that needs some caulk. If the wood is turning black, it needs attention early before it becomes a bigger issue. If it’s a small amount of decay, restorers like us typically start by spraying something like CPR (a log cleanser by Sashco) or a TSP (trisodium phosphate) solution on the effected area and wiping it with a cloth. After that dries out, we recommend applying borates into the check; then, once the borate solution dries completely, sealing the check to prevent water collection in the future.
This is all something homeowners can do on their own, if they choose. If it goes beyond minor surface decay and into wood rot (when the damage is deep inside the log or timber causing it to lose strength and crumble or appear spongy), fear not! Log home restoration pros can fix that in several ways. The first step is to asses how extensive the rot is. Has it penetrated the entire log or just slightly under the surface? If the latter, the solution is almost always to cut away the face of the log, typically to a depth of 1 1/2 inches or so, and put a new face (similar to half-log siding) that matches the existing log on top of it. The new log face is attached with wood epoxy and screws that are countersunk and hidden, so it blends in. Once stained, no one will be able to tell it was replaced. However, if the rot runs deep, the whole log may need to go. In this case the log is cut away using a chainsaw. This also may entail severing a through-bolt or lag screw in the corner system. Chances are that this connector has long since done its job to pull the log courses tightly together, so rarely is it an issue.


What if there isn’t any structural damage but a home’s stain is worn or discolored from sunlight? How is that restored?
There are different ways to handle stain removal. We usually opt for media blasting with glass. You can use corncobs, but because corn is a biodegradable material, it can get into the checks, turn black and rot if you’re not careful. The solid glass is granular, recycled and easy to clean off. No matter what media is used, logs have to be thoroughly sanded and cleaned with an air-compressor (to keep them dry) before new water- or latex-stain, like those from Sashco or Perma-Chink, or an oil-based stain, like Outlast Q8 by CTA Products, is applied.
See also Heart Wood vs. Sap Wood: What Does it Mean?
What about issues from insects or wildlife, like carpenter bees or woodpeckers?
For insects, there are two different scenarios: Wood-boring bugs that live in the wood and those that eat it. For the latter, we apply a borate solution to the whole house that will kill the bugs when they ingest it; however, that’s not effective on the ones who just want to move in, like carpenter bees. They bore into the wood solely to lay eggs, so the products you’d use to kill other insects, like termites, don’t work on them.
For carpenter bees, the key is to stay on top of them and treat each individual hole when you see one. Most stain manufacturers sell additives that will deter carpenter bees, but after several years, these products lose strength and need to be reapplied. Companies like ISK Biocides (which makes BEE Gone) and Ehrlich make great products that both kill and repel carpenter bees. I often use a chemical called Dry-On, that’s puffed directly into the holes and kills the bees and larvae. Then you need to close the holes with caulk or another material the bees can’t bore into to prevent them from coming back. Believe it or not, inserting bits of steel wool into the holes before you caulk helps, too. Animals like woodpeckers aren’t really after your house, they’re after the insects. So if you stay on top of your stain and insect repellent, chances are other animals won’t be interested in your log home.
If you find a problem, whether it’s bugs or birds, it’s important to fix it the right way the first time. If you don’t, it’s likely that they’ll keep coming back.
What if you buy an antique or historic log home, or even a newer one that’s just sat neglected for years? How do you tackle a total overhaul?
We’ve gotten calls from folks who’ve bought log homes built in the late 1800s or early 1900s and the most common issue is that the chinking is cracked or falling out. Back then, people typically used concrete or a mixture of mud and horsehair. This material needs to be replaced with modern, flexible chinking for air tightness. We also often have to replace full or partial logs that have succumbed to moisture. We can go in and surgically remove logs that are beyond repair, saving as much of the original structure as we can.
Once that’s done and the logs are stripped, clean and dry, the whole structure is re-stained and, finally, re-chinked and/or resealed. An issue that’s more common than you’d think is when someone paints a log home. Often people who don’t research and build their own log home don’t understand that paint doesn’t allow moisture to escape the logs, causing rot. We always recommend removing paint with media blasting and then staining the house properly.
What’s the key to preparing for any kind of repair or restoration?
First of all, don’t panic. Whether the damage has been from insects, water, fire, hail or woodpeckers, there hasn’t been a log home that our company has seen that we haven’t been able to repair. If your home is new, perform your seasonal inspections. In a log home, you have an advantage that nearly all of your wood is exposed and visible. If you’ve inherited the damage from previous owners, just know that it can be fixed – and do it right, right out of the gate.
See also The Top Remodeling Project of the Year: Garage Doors